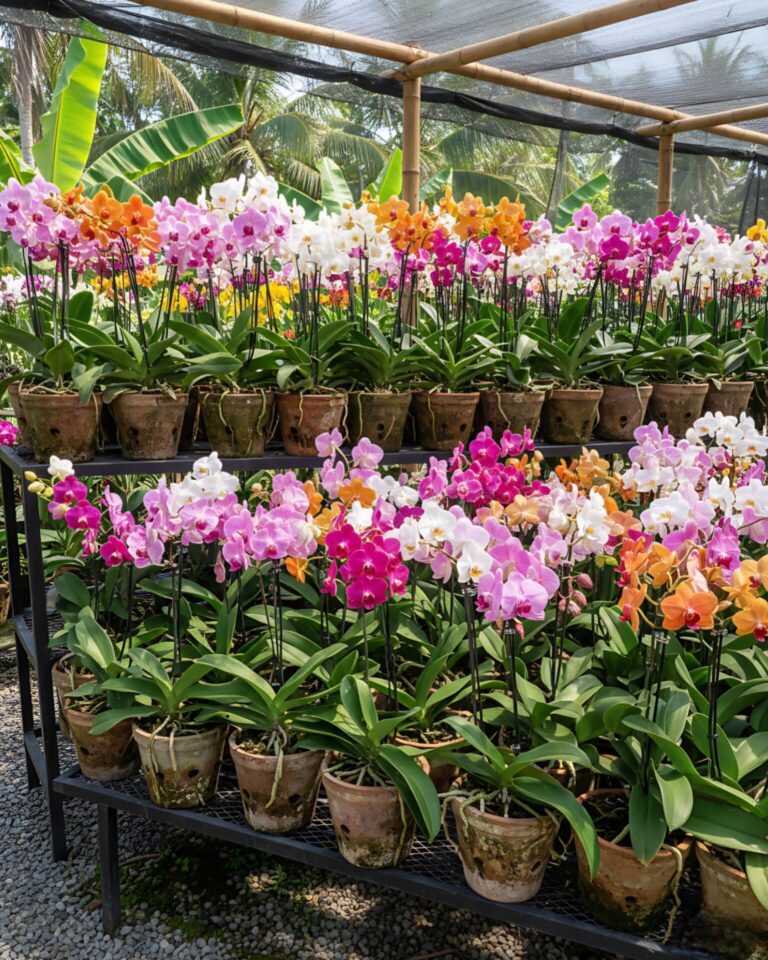
11 Reasons Why Orchid Leaves Turn Yellow ( And Fixes That Work)
You walk past your orchid one morning and notice it — a leaf that was once a healthy, deep green is now turning yellow at the edges. It is unsettling, especially if you have been caring for the plant with real attention and effort. Orchids have a reputation for being difficult, and yellowing leaves only seem to confirm that fear.
But here is what most guides will not tell you upfront: yellowing orchid leaves are not always a sign that something has gone wrong. Sometimes it is completely natural. Other times, yes, it signals a problem that needs your attention. The key is knowing which situation you are dealing with — and that is exactly what this article will help you figure out.
We will go through every common reason why orchid leaves turn yellow, explain how to identify each cause, and tell you what to do about it. After that, we will cover the ideal growing conditions every orchid needs so you can get back on track and keep your plant healthy long-term.
First: Understand That Some Yellowing Is Normal
Before assuming the worst, check which leaves are turning yellow. If it is the lowest, oldest leaves at the base of the plant that are yellowing — one or two at a time — this is likely just natural aging.
Orchids, like most plants, shed their oldest leaves periodically to redirect energy toward new growth. This process is gradual and orderly. The leaf yellows slowly, then drops or dries up cleanly. The rest of the plant looks healthy. No spots, no mushiness, no sudden change.
If this describes what you are seeing, you can breathe easy. It is normal. However, if the yellowing is affecting newer or middle leaves, appearing rapidly, or accompanied by soft texture, spots, or wilting — then something else is going on. Read on.
Why Are My Orchid Leaves Turning Yellow?
1. Overwatering — The Most Frequent Culprit
If I had to name one single cause responsible for the majority of orchid problems — including yellow leaves — it would be overwatering. Orchids are not like most houseplants. They do not like to sit in moisture. Their roots need to dry out partially between waterings.
When orchids are watered too frequently, the roots suffocate. Wet, oxygen-deprived roots cannot absorb water or nutrients effectively, even though they are surrounded by both. The plant begins to starve in a sense, and leaves turn yellow as a result.
Overwatered roots often appear brown, mushy, and may smell slightly off. Healthy roots are firm and typically appear white or silver when dry and green when freshly watered.
What you can do:
Allow the potting medium to dry out significantly between waterings. In most homes, watering once every 7 to 10 days is appropriate, though this varies with humidity, pot size, and season. Always check the roots before watering, not just the surface of the medium.
If the roots look brown and soggy, hold off and let the plant dry.
2. Underwatering and Dehydration
On the opposite end, underwatering can also cause yellowing leaves, though it presents somewhat differently. When an orchid is consistently too dry, its leaves may yellow, wrinkle, or develop a leathery, limp texture. The yellowing in this case is often accompanied by shriveled pseudobulbs (in sympodial orchids) and very dry, silvery-white roots that have not greened up after a long time.
This is a less common problem than overwatering but does occur — especially in warm, dry climates or during winter when indoor heating reduces humidity significantly.
What you can do:
Increase watering frequency and consider soaking the pot in room-temperature water for 10 to 15 minutes once a week rather than just pouring water over the top. This ensures the roots are thoroughly rehydrated. Watch for the roots to turn green shortly after watering — that is a sign of healthy hydration.
3. Too Much Direct Sunlight
Orchids are sensitive to intense, direct sunlight. Most popular orchid varieties — particularly Phalaenopsis (moth orchids), which are the most common type sold in garden centers — are adapted to grow in filtered, indirect light conditions. Direct sun, especially from a south or west-facing window in summer, can cause leaf tissue to break down.
The yellowing from sun damage often starts at the top of the leaf or on the side facing the light source. It may progress to a washed-out, pale yellow or even a yellowish-white bleaching. In severe cases, the affected area turns brown and crispy — what is known as sunscorch.
What you can do:
Move the orchid to a location with bright but indirect light. East-facing windows are ideal for most orchids. If only south or west windows are available, use a sheer curtain to diffuse the light. The leaves should appear a medium green — not dark green (too little light) and not yellowish-pale (too much light).
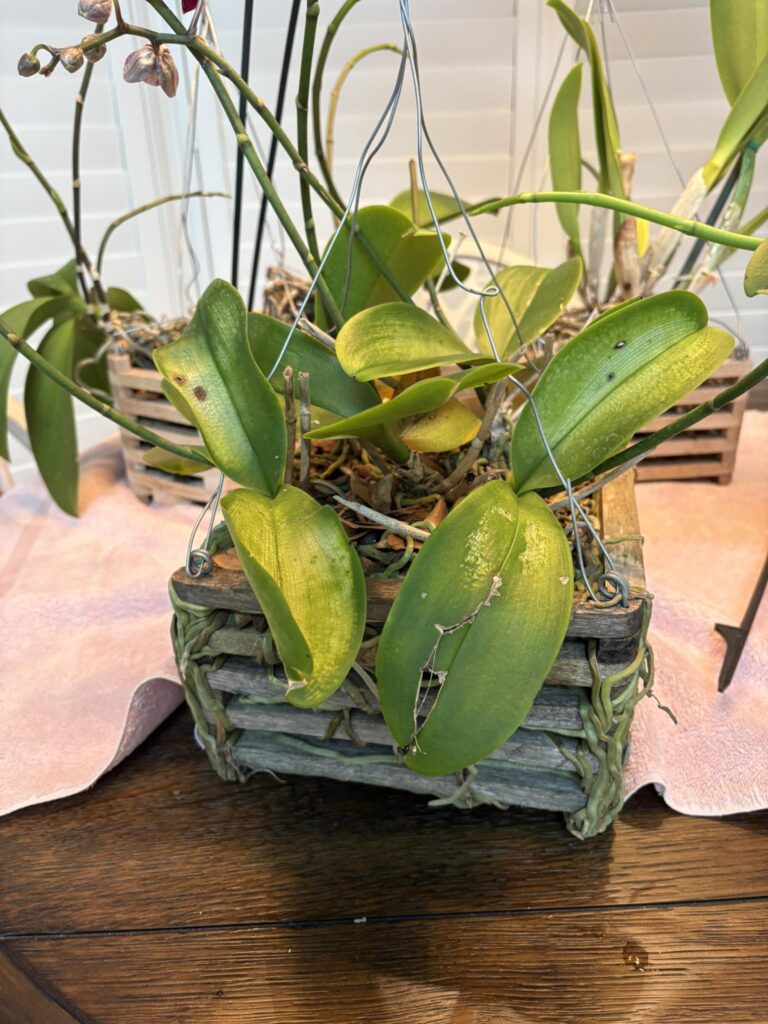
4. Insufficient Light
This one surprises many people, but too little light can also cause orchid leaves to yellow. When a plant does not receive adequate light, it cannot carry out photosynthesis efficiently. Over time, chlorophyll — the pigment that makes leaves green — breaks down and is not replenished. The result is a slow yellowing that affects the entire leaf rather than one section.
Orchids grown in dark corners or rooms with small or north-facing windows often suffer from insufficient light. The yellowing in this case tends to be uniform and gradual, and the plant may also fail to bloom.
What you can do:
Relocate the orchid closer to a window with more natural light. Alternatively, supplemental grow lights designed for orchids can be highly effective, especially in darker homes or during winter months when natural light diminishes.
5. Temperature Stress
Orchids are tropical plants. They do not tolerate cold drafts, sudden temperature swings, or prolonged exposure to temperatures below 50°F (10°C). Cold stress causes cell damage in the leaves, often manifesting as yellowing, water-soaked patches, or a darkening of the affected tissue.
Common sources of cold stress include placement near drafty windows or doors in winter, air conditioning vents blowing directly on the plant in summer, or leaving the plant outside on a cool autumn evening longer than intended.
Heat stress from temperatures consistently above 95°F (35°C) can also cause yellowing, though this is less common in typical indoor environments.
What you can do:
Keep orchids in a stable temperature range of 60°F to 85°F (15°C to 29°C). Avoid placing them near exterior doors, air conditioning units, heating vents, or cold windowsills. Consistency matters as much as the actual temperature.
6. Nutrient Deficiency
A lack of key nutrients — particularly nitrogen, magnesium, or iron — can cause orchid leaves to yellow. Each deficiency presents slightly differently. Nitrogen deficiency causes overall pale yellowing of the entire leaf. Magnesium deficiency produces interveinal chlorosis — the veins remain green while the tissue between them yellows. Iron deficiency typically affects newer leaves first.
Orchids grown in bark-based media are especially prone to nutrient deficiencies over time, as bark decomposes slowly and releases very few nutrients. Plants that have not been fertilized in months often show signs of deficiency.
What you can do:
Use a balanced orchid-specific fertilizer diluted to half-strength, applied every two to four weeks during the growing season. The commonly recommended formula is “weakly, weekly” — meaning a very dilute fertilizer solution applied regularly is better than a strong dose applied infrequently.
Pro Tip: Flush the potting medium with plain water once a month to prevent salt buildup from fertilizer residue.
7. Root Rot
Root rot is closely linked to overwatering, but it deserves its own section because it can persist even after watering habits are corrected. Root rot is caused by fungal pathogens — most commonly Phytophthora and Pythium species — that thrive in waterlogged, poorly aerated conditions.
Once root rot takes hold, the damaged roots can no longer transport water and nutrients to the leaves, which then begin to yellow, soften, and collapse. Unlike overwatering yellowing, which may reverse when the plant dries out, root rot requires active intervention.
Signs of root rot include: mushy, brown or black roots, a sour or fermented smell from the potting medium, and yellowing leaves that remain soft and limp even after watering.
What you can do:
Remove the orchid from its pot immediately. Trim all brown, mushy roots with sterilized scissors or a blade. Let the cut surfaces dry for 20 to 30 minutes before repotting in fresh, well-draining bark medium. Do not water immediately — wait two to three days to allow the root wounds to callous.
Apply a diluted hydrogen peroxide solution (3%) to the root zone to help neutralize remaining pathogens if needed.
8. Overfeeding and Fertilizer Burn
While nutrient deficiency causes problems, so does the opposite. Applying too much fertilizer — or using it at full strength — causes salt accumulation in the potting medium. These excess salts draw moisture out of the roots through osmosis, effectively burning them. The damage manifests as yellowing leaves, brown leaf tips, and shriveled roots.
This is a common mistake among new orchid owners who assume that more fertilizer means faster growth. It does not. Orchids are light feeders by nature.
What you can do: Flush the potting medium thoroughly with plain water to leach out accumulated salts. Going forward, always dilute fertilizer to half or even quarter strength. Stop fertilizing during winter dormancy when the plant’s nutrient needs are minimal.
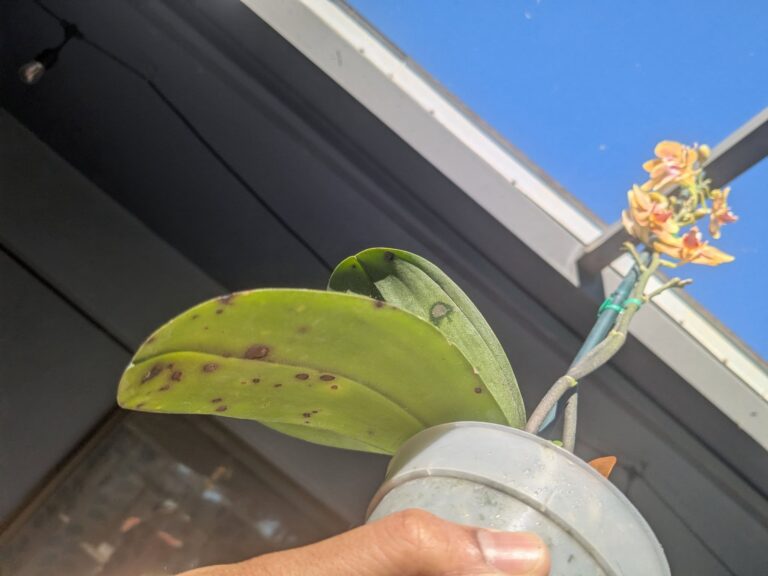
9. Bacterial and Fungal Infections
Bacterial and fungal diseases can cause rapid, spreading yellow patches on orchid leaves. Bacterial rot, caused by organisms like Erwinia and Pseudomonas, typically begins as water-soaked, translucent spots that quickly turn yellow and then brown. The affected area often has a mushy texture and may release a foul odor.
Fungal infections, including those caused by Botrytis and Cercospora, tend to produce more defined spots with concentric rings or a powdery surface coating. Spread occurs most rapidly in cool, humid, poorly ventilated conditions.
What you can do:
Isolate the affected plant immediately to prevent spread. Remove and discard infected leaves using sterilized tools. Apply a copper-based bactericide or appropriate fungicide depending on the type of infection. Improve air circulation around the plant and avoid wetting the leaves during watering.
10. Repotting Shock
If your orchid recently underwent repotting, the yellowing may simply be a stress response. Repotting disrupts the root system and forces the plant to redirect energy toward reestablishing roots rather than maintaining foliage.
One or two leaves may yellow in the weeks following repotting, particularly if older leaves at the base of the plant are affected.
This type of yellowing is generally temporary and not a cause for serious concern, provided the plant was repotted correctly into fresh, appropriate medium.
What you can do: Place the recently repotted orchid in a stable, bright-but-indirect light location. Avoid fertilizing for at least four to six weeks after repotting to allow the roots to recover. Water sparingly until you see signs of new root growth.
11. Pests
Several common orchid pests — including spider mites, mealybugs, and scale insects — can cause yellowing leaves by feeding on plant tissue and sap. The damage from spider mites often appears as fine, stippled yellowing across the leaf surface, while mealybugs and scale create localized yellowing around feeding sites.
Pest infestations are easier to manage when caught early. Regularly inspecting the undersides of leaves and the base of the plant is one of the most effective preventive habits an orchid grower can adopt.
What you can do: Wipe leaves with a damp cloth or cotton swab soaked in isopropyl alcohol to remove mealybugs and scale. For spider mites, rinse the plant thoroughly and apply insecticidal soap or neem oil. Repeat treatment every seven to ten days for several weeks to break the pest life cycle.
The Right Growing Conditions for Orchids
Now that the problems are covered, it helps to understand the baseline conditions that keep orchids healthy — and help prevent the issues above from developing in the first place.
Light: Bright and Indirect
Most orchids — especially Phalaenopsis — need bright, indirect light for 10 to 14 hours per day. East-facing windows provide ideal morning sun without the intensity of afternoon exposure. South or west windows work with sheer curtain filtering. Leaves should be a medium, grassy green. Dark green indicates insufficient light; pale yellow-green indicates too much.
Watering: Less Is Usually More
The single most important rule of orchid watering is this: when in doubt, wait. Most orchids prefer to dry slightly between waterings. In typical indoor conditions, watering once weekly is a reasonable starting point, adjusted based on how quickly the medium dries.
Always use room-temperature water. Cold water can shock the roots. Water in the morning so excess moisture on the leaves and crown can evaporate before night, reducing fungal and bacterial risk.
Potting Medium
Orchids should never be grown in regular potting soil. Bark-based orchid mix is the standard for most varieties because it provides the aeration and drainage orchid roots require. Some growers use sphagnum moss, perlite mixes, or LECA (expanded clay aggregate) with success, though bark remains the most widely recommended and accessible option.
Repot every one to two years or when the bark begins to break down and lose its structure. Decomposed bark retains too much moisture and reduces aeration.
Humidity
Orchids prefer a relative humidity of 40 to 70 percent. Most homes run well below this range, especially in winter. A humidity tray (a shallow tray filled with pebbles and water, placed beneath the pot — without the pot touching the water) or a room humidifier can help raise ambient moisture levels without waterlogging the roots.
Temperature
Maintain temperatures between 60°F and 85°F (15°C to 29°C) during the day, with a slight drop of 10 to 15 degrees at night. This temperature differential, in fact, helps stimulate blooming in many orchid varieties. Avoid temperature extremes and drafts at all times.
Fertilization
Feed with a diluted, balanced orchid fertilizer (such as a 20-20-20 formula at half strength) every two to four weeks during the active growing season. Reduce or eliminate fertilizing in winter when growth slows. Flush the medium with clean water monthly to prevent salt buildup.
Air Circulation
Good air movement around orchids is often underestimated. Stagnant, humid air is a primary driver of fungal and bacterial disease. A gentle fan nearby — not blowing directly at the plant — can significantly improve conditions. Avoid crowding orchids too closely together, as this limits airflow and facilitates the spread of pests.
Suggested For You:
Are Orchids Toxic to Cats? What Every Pet Owner Needs to Read
Black Spots on Orchid Leaves Are a Warning Sign — Here Is What Your Plant Is Trying to Tell You
Your Rose Leaves Are Curling — And the Reason Is Closer Than You Think
11 Reasons Your Azaleas Are Not Blooming This Spring (And How to Fix)
Final Thoughts
Yellowing orchid leaves can be alarming, but they are also informative. The plant is communicating something about its environment or care routine, and if you take the time to read the signs correctly, you can almost always identify the cause and take corrective action.
Start with the basics: Check the roots, evaluate the watering schedule, assess the light level, and rule out pests and disease. Work through one variable at a time rather than making multiple changes at once, which makes it harder to identify what actually worked.
Orchids are resilient plants when their basic needs are met. With the right adjustments and a bit of patience, most will recover and — given enough time and the right conditions — bloom again beautifully.
References
- University of Florida IFAS Extension — Phalaenopsis Orchids: Growing Them Successfully Indoors https://edis.ifas.ufl.edu/publication/EP001
- Penn State Extension — Orchid Diseases and Their Management https://extension.psu.edu/orchid-diseases
- University of Hawaii at Manoa, College of Tropical Agriculture and Human Resources — Orchid Production and Culture https://www.ctahr.hawaii.edu/oc/freepubs/pdf/OF-39.pdf
- Purdue University Extension — Growing Orchids Indoors https://www.extension.purdue.edu/extmedia/HO/HO-98.pdf
- North Carolina State University Extension — Orchid Care and Common Problems https://plants.ces.ncsu.edu/plants/phalaenopsis/
Tim M Dave is a gardening expert with a passion for houseplants, particularly cacti and succulents. With a degree in plant biology from the University of California, Berkeley, he has vast experience in gardening. Over the years, he has cultivated a vast collection of desert plants and learned a great deal about how to grow and care for these unique companions.