Spider Plant Cultivation: Features and How to Grow These Beauties in Your Home
Spider plant (Chlorophytum comosum) is one of my favorite houseplants. Their vibrant, arching leaves and glow make them a joy to grow. Because of its popularity, you will hear people call it by different names, including a spider ivy, airplane plant, or ribbon plant.
I first fell in love with spider plants when I saw one cascading over a friend’s bookshelf, its leaves spilling like a green waterfall. This gave me a special interest in learning how to cultivate it. Today, I’m glad that I propagate them like a pro and share the joy with friends and family.
Let’s dive into the world of these low-maintenance plants and make your home greener!
A Brief History and Classification of Spider Plants
Native to tropical and southern Africa, spider plants have been cherished for centuries. They were first described in 1794 by Swedish botanist Carl Thunberg, who named them Chlorophytum, made of two Greek words “chloros” (green) and “phyton” (plant).
The species name comosum refers to their tufted, arching foliage, which gives them a distinctive look.
Spider plants belong to the Asparagaceae family, alongside plants like asparagus, agave, and yucca. They’re herbaceous perennials, meaning they can live for years with proper care. In their native habitat, they thrive in shaded forests or grasslands, often as ground cover.
Adapting to a range of conditions, this resilience made them a global favorite. This is especially during the houseplant boom of the 1970s and 1980s, when they became a staple in homes and offices.
Their popularity isn’t just about looks. Spider plants were highlighted in NASA’s 1989 Clean Air Study for their ability to remove indoor air pollutants like formaldehyde and benzene. This makes them both beautiful and beneficial to your health.
Characteristic Features of Spider Plants
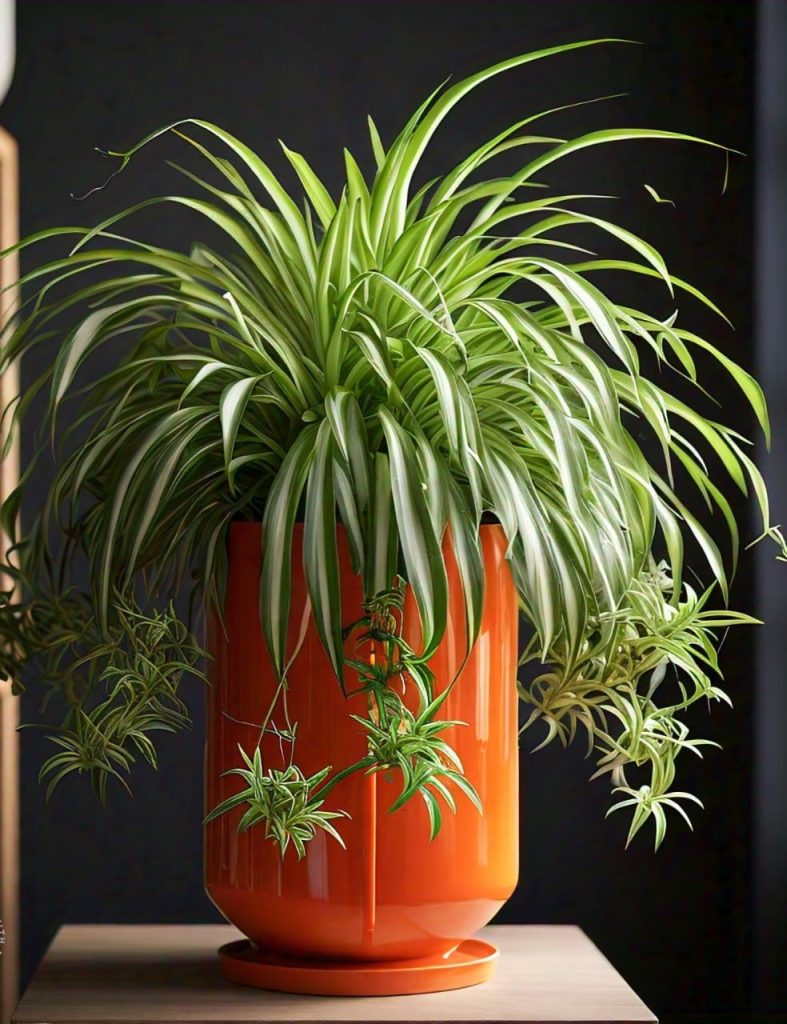
Why do I adore spider plants? Let me count the ways! These plants have long, slender leaves that can grow up to 18–24 inches, arching gracefully from the center. The most common varieties have green leaves with creamy white or yellow stripes. Solid green types exist too.
The variegated patterns add a pop of color, making them a standout in any room.
The real magic happens with their “spiderettes” or plantlets. These tiny offshoots dangle from long stalks called stolons, looking like little green parachutes ready to take flight.
Each plantlet is a mini spider plant, complete with roots, and ready to be propagated. I’ve lost count of how many I’ve gifted to friends! In ideal conditions, spider plants also produce small, star-shaped white flowers. While not as showy as the foliage, these blooms add a delicate charm.
Spider plants are also air-purifying superstars. According to NASA, they can remove up to 90% of certain toxins from indoor air within 24 hours. That’s a huge perk for anyone wanting a healthier home. You can learn more about this at NASA’s Clean Air Study.
Good news for pet owners: spider plants are non-toxic to cats and dogs, according to the ASPCA. My cat loves nibbling on the leaves, but it’s harmless. Just watch for vomiting if they eat too much, as it can upset their stomach.
Comprehensive Care Guide for Spider Plants
Caring for spider plants is so easy. Even without any experience, I couldn’t mess it up when I started my plant journey. Below, I’ve broken down every aspect of care to help you grow a lush, healthy spider plant.
Light Requirements
Spider plants thrive in bright, indirect light. I keep mine near a north-facing window, where it gets soft, filtered sunlight all day. East or west-facing windows work too, as long as the light isn’t too intense. They can tolerate low light, but their variegation may fade, and growth will slow.
Direct sunlight, on the other hand, can scorch their leaves. This can leave unsightly brown spots. If you’re using artificial lights, aim for 12–16 hours of grow light daily. I’ve had success with a simple LED grow bulb for my indoor plants.
If your plant’s leaves look pale or lack vibrancy, try moving it closer to a light source. Conversely, if you notice crispy edges, it’s getting too much sun. Finding the right spot took me a bit of trial and error, but once I did, my spider plant exploded with growth.
Watering
Watering is where most people trip up, myself included at first. Spider plants like their soil to stay slightly moist but not soggy. I water mine about once a week but after checking the top inch of soil first. If it’s dry, I give it a good drink.
In winter, I cut back to every 10–14 days since the plant grows more slowly. Always use a pot with drainage holes to prevent water from pooling at the bottom. It is the leading cause of root rot. Terracotta pots are great because they wick away excess moisture.
Here’s a pro tip: Spider plants are sensitive to fluoride and chlorine in tap water. It can cause brown leaf tips. Using distilled or rainwater can make a huge difference. If you must use tap water, let it sit out for 24 hours to let the chemicals dissipate.
Soil and Potting
Spider plants aren’t fussy about soil, but they do best in a well-draining potting mix. I use a standard houseplant potting soil mixed with 20% perlite or sand to improve drainage. A slightly acidic to neutral pH (6.0–7.2) is ideal. You can buy pre-mixed potting soil or make your own by combining:
- 2 parts potting soil
- 1 part perlite
- 1 part peat moss or coco coir
Repot every 1–2 years or when you see roots crowding the pot. I learned this the hard way when my first spider plant’s roots started pushing through the drainage holes! Choose a pot 1–2 inches larger than the current one, and make sure it has drainage holes.
Temperature and Humidity
Spider plants prefer temperatures between 60–80°F (15–27°C). They’re not frost-tolerant, so keep them indoors if you live in a cold climate. I’ve found they do fine in typical household temperatures. However, avoid placing them near drafty windows or heating vents, which can dry them out.
These plants also love moderate to high humidity, around 40–60%. In dry climates or during winter when heaters are running, mist your plants every few days or place a pebble tray filled with water nearby. You can also group them with other plants to create a humid microclimate.
If you notice crispy leaf tips, it’s often a sign of low humidity. The quickest solution to this is to use a humidifier around the plants.
Fertilizing
To keep your spider plants lush, feed them a balanced, water-soluble fertilizer (like 10-10-10 or 20-20-20) every 4–6 weeks during spring and summer. Dilute it to half strength to avoid burning the roots. Overfertilizing can cause brown tips or stunted growth, so less is more.
In fall and winter, skip fertilizing altogether since the plant’s growth slows down. Feeding your plant during this period is simply a waste of money. It can also lead to salt accumulation in the soil as most of the fertilizer remains unused.
Organic options like fish emulsion or compost tea work well too. I tried fish emulsion once, and it worked wonders. However, the smell was a bit much for my small apartment! Stick to a schedule, and your plant will reward you with vibrant leaves.
Propagation
Propagating spider plants is my favorite part—it’s like getting free plants! Those dangling plantlets are ready to become new plants. Here’s my step-by-step process:
- Choose a healthy plantlet. Look for one with small roots already forming.
- Use clean scissors to snip the plantlet from the stolon.
- Place it in a glass of water or directly into moist soil. If using water, change it every few days. Roots should form in 1–2 weeks.
- Once roots are 1–2 inches long, transfer to a small pot with well-draining soil.
- Keep the soil moist and place in bright, indirect light.
I’ve propagated dozens of spider plants this way and given them as gifts. It’s so satisfying to watch a tiny plantlet grow into a full-fledged plant!
Pruning
Pruning keeps your spider plant looking neat. I trim off brown or yellowing leaves at the base with clean scissors. If the stolons get too long or the plantlets start looking scraggly, I cut those back too.
Regular pruning also encourages new growth and keeps the plant from getting leggy. Removing spent flowers helps redirect energy to the foliage.
Common Problems and Solutions
Even though spider plants are tough, they can face issues. Here’s a look at the most common problems I’ve encountered and how to fix them.
1. Brown Leaf Tips
Brown tips are the bane of every spider plant owner’s existence. I’ve dealt with this plenty of times! The causes include:
- Fluoride/chlorine in water: Switch to distilled, rainwater, or filtered water. I started using a water filter pitcher, and the brown tips disappeared.
- Low humidity: Mist the leaves every few days or use a humidifier. I also place a tray of water with pebbles near my plants.
- Overfertilizing: Flush the soil with water to remove excess salts, then reduce fertilizer frequency or strength.
- Dry soil: If you’ve been underwatering, increase watering slightly, ensuring the soil stays lightly moist.
Trim brown tips with scissors for a cleaner look, but cut at an angle to mimic the natural leaf shape.
2. Yellowing Leaves
Yellow leaves can make your plant look sad, but they’re fixable. Common causes are:
- Overwatering: Check the roots. If they’re soggy or black, trim the damaged parts and repot in fresh soil. I lost a plant to overwatering early on, so now I’m extra cautious.
- Poor drainage: Ensure your pot has drainage holes and the soil isn’t compacted.
- Too much sun: Move the plant to a spot with indirect light. I once left a spider plant on a sunny windowsill, and the leaves turned pale yellow within days.
- Nutrient deficiency: If you haven’t fertilized in a while, give it a diluted dose of fertilizer.
3. No Plantlets
If your spider plant isn’t producing those adorable spiderettes, it might be:
- Immature: Young plants need time to establish before producing plantlets. Mine took about a year to start.
- Insufficient light: Move it to brighter, indirect light. I noticed my plant produced more babies after I moved it closer to a window.
- Stress: Overwatering, underwatering, or poor soil can stress the plant. Address any care issues first.
4. Pests
Spider plants are relatively pest-resistant, but they’re not immune. I’ve battled spider mites, aphids, and mealybugs. Here’s how I handle them:
- Spider mites: Look for tiny webs or speckled leaves. Wipe leaves with a damp cloth and spray with neem oil or insecticidal soap. I do this weekly until they’re gone.
- Aphids: These tiny green bugs cluster on new growth. Blast them off with water or use a mild soap solution.
- Mealybugs: Look for white, cottony patches. Dab them with rubbing alcohol using a cotton swab.
Regularly inspect your plant, especially under leaves. For more pest control tips, visit Penn State Extension’s houseplant pest guide.
5. Root Rot
Root rot is a silent killer. I learned this after overwatering my first spider plant. Signs include wilting despite moist soil, a foul smell, or mushy roots. To fix it:
- Remove the plant from the pot.
- Trim away black or soft roots with sterile scissors.
- Repot in fresh, well-draining soil.
- Water sparingly until the plant recovers.
To prevent root rot, always use a pot with drainage holes and avoid letting the plant sit in water.
6. Leggy Growth
If your spider plant looks sparse or stretched, it’s likely not getting enough light. Move it to a brighter spot. Remember to trim back leggy leaves to encourage fuller growth. Rotating the pot every few weeks ensures even light exposure.
7. Fading Variegation
Variegated spider plants can lose their stripes in low light. I noticed this when I kept one in a dim corner. Move it to brighter, indirect light, and the variegation should return with new growth. Avoid direct sun, though, as it can burn the leaves.
Extra Tips for Spider Plant Success
Here are some additional insights I’ve picked up over the years to take your spider plant game to the next level:
1. Seasonal Care Adjustments
Spider plants need slight tweaks depending on the season. In spring and summer, they’re in active growth, so water more frequently, fertilize regularly, and provide ample light. In fall and winter, growth slows, so reduce watering and skip fertilizer.
2. Choosing the Right Variety
Spider plants come in several varieties, each with a unique look:
- Variegatum: Green leaves with white stripes down the center. This is the classic type I started with.
- Vittatum: White stripes with green edges, giving a bolder contrast.
- Bonnie: Curly leaves with the same variegation as Variegatum. I love its quirky vibe!
- Hawaiian: A newer variety with subtle variegation and a compact size.
Experiment with different types to find your favorite. Most care requirements are the same across varieties.
3. Decorating with Spider Plants
Spider plants are versatile for home decor. I have one in a hanging basket, where its stolons cascade dramatically. They also look great on shelves, in macramé hangers, or as a centerpiece in a decorative pot. Their arching leaves soften sharp corners and add a tropical feel.
4. Companion Planting
Spider plants pair well with other low-maintenance houseplants like pothos, peace lilies, or snake plants. I group mine together to create a lush indoor jungle. They share similar light and humidity needs, making care easier.
5. Outdoor Growing
In warm climates (USDA zones 9–11), spider plants can grow outdoors as ground cover or in containers. I tried this during a summer in a mild climate, and they loved it! Keep them in partial shade and protect them from frost. Bring them indoors if temperatures drop below 50°F (10°C).
FAQs
Here are short answers to the frequently asked questions about growing spider plants
Q: How often should I water my spider plant?
A: Water when the top inch of soil is dry, typically every 7–10 days. Reduce watering in winter.
Q: Can spider plants survive in low light?
A: Yes, but they prefer bright, indirect light for optimal growth. Low light may cause fading variegation or slower growth.
Q: Why are my spider plant’s leaves turning brown at the tips?
A: Brown tips are often caused by fluoride in water, low humidity, or overfertilizing. Use filtered water, mist regularly, and reduce fertilizer.
Q: How do I propagate spider plant babies?
A: Snip a plantlet, place it in water or soil, and wait for roots to form (1–2 weeks). Plant in a pot with well-draining soil.
Q: Are spider plants safe for pets?
A: Yes, they’re non-toxic to cats and dogs, per the ASPCA. Excessive nibbling may cause mild stomach upset.
Q: Why isn’t my spider plant producing plantlets?
A: It may be too young, lack light, or be stressed. Ensure bright, indirect light and proper care.
Q: How big do spider plants get?
A: They can spread 2–3 feet wide with leaves up to 18–24 inches long, depending on pot size and conditions.
Q: Can I grow spider plants outdoors?
A: Yes, in USDA zones 9–11, in partial shade. Protect from frost and bring indoors if temperatures drop below 50°F.
Final Thoughts
Spider plants have brought so much joy to my home. Their resilience, air-purifying powers, and ability to produce endless plantlets make them a dream for any plant lover. Whether you’re decorating a cozy apartment or building an indoor jungle, spider plants are a fantastic choice.
Follow the care tips above, stay proactive about problems, and you’ll have a thriving, cascading beauty for years to come.
Got a spider plant story or question? Share it below—I’d love to hear about your journey! Happy growing!
Helpful Resources
- Missouri Botanical Garden: Detailed spider plant care info.
- University of Wisconsin-Madison Extension: In-depth care and propagation tips.
- Gardening Know How: Beginner-friendly advice.
- Royal Horticultural Society: UK-based care tips.
Tim M Dave is a gardening expert with a passion for houseplants, particularly cacti and succulents. With a degree in plant biology from the University of California, Berkeley, he has vast experience in gardening. Over the years, he has cultivated a vast collection of desert plants and learned a great deal about how to grow and care for these unique companions.