3 Methods for Propagating Fiddle Leaf Fig: How to Expand Your Collection
One of the most rewarding ways to expand your fiddle leaf fig collection (or share it with friends) is through propagation. And it’s easier than you might think. In this guide, I’ll walk you through the entire process of propagating a fiddle leaf fig, sharing my own successes and flops.
Before we jump into the how-to, let’s talk about why propagation is worth your time. Propagating a fiddle leaf fig lets you:
- Grow new plants for free: These plants can be pricey, so making your own is a budget-friendly win.
- Encourage bushier growth: Pruning for propagation can make your original plant fuller and healthier.
- Share with friends: Rooted cuttings make thoughtful gifts for fellow plant lovers.
- Learn and experiment: Propagation is a fun way to deepen your plant-care skills and connect with your fig.
My first propagation adventure began when my fiddle leaf fig started looking leggy and sparse. I was nervous to cut it, but the process not only gave me a new plant but also revitalized the original. Now, I have three thriving figs from that one experiment, and I love it!
How to Propagate Fiddle Leaf Fig
There are three methods for propagating fiddle leaf fig. They are all straightforward and here is my step-by-step guide on how they are done.
Tools and Materials You’ll Need
To set yourself up for success, gather these essentials:
- Clean, sharp pruning shears or scissors for clean cuts that won’t harm the plant.
- A healthy fiddle leaf fig. Choose a mature plant with strong, vibrant stems.
- Clean glass or jar (for water propagation). This will help you monitor root growth.
- Well-draining potting mix (for soil propagation). Mix potting soil with perlite and bark for aeration.
- Small pot with drainage holes for planting rooted cuttings.
- Rooting hormone (optional). This can help boost root development, especially for soil propagation.
- Plastic bag or dome (optional), commonly used for creating a humid environment for soil propagation.
- Rubbing alcohol or disinfectant to sterilize tools and prevent infections.
- Filtered or distilled water (for water propagation) to avoid chemicals that may hinder rooting.
I keep a dedicated plant-care kit with these items. Sterilizing my shears with rubbing alcohol has been a game-changer for preventing bacterial issues.
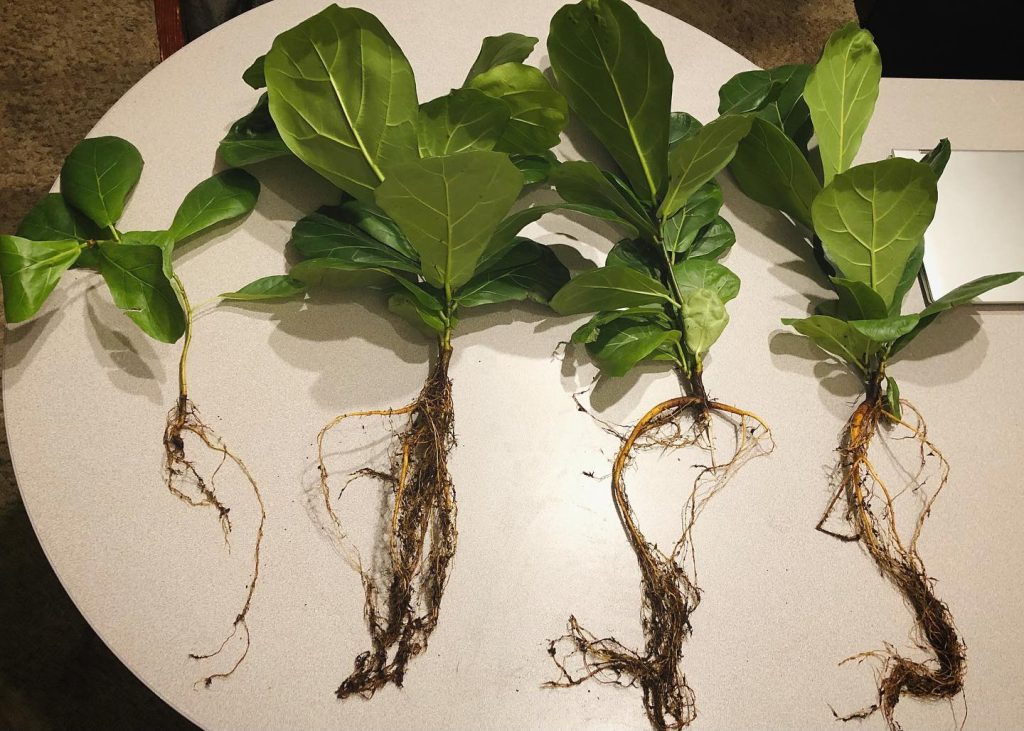
Method 1: Propagating Fiddle Leaf Fig in Water
Water propagation is my go-to method because it’s straightforward. I also enjoy watching the roots develop like a science experiment. Here’s how to do it, step by step:
Step 1: Select a healthy stem
Choose a stem that’s at least 6 inches long with 2–4 healthy leaves. Look for a green, firm stem—avoid woody or weak ones. Propagating a woody stem can take forever to root. The best time to propagate is in spring or early summer when the plant is actively growing.
Step 2: Make the cut
Using sterilized shears, cut just below a leaf node (the spot where a leaf attaches to the stem) at a 45-degree angle. Nodes are where roots form, so this is critical. My first cut was too far from the node, and the cutting struggled. Remove the bottom leaves, leaving 1–2 at the top.
Step 3: Place in water
Place the cutting in a clean glass of filtered or distilled water. Ensure the node is submerged, but the leaves stay dry. I use a mason jar because it’s sturdy and lets me see the roots. Change the water every 3–5 days to keep it fresh.
Place the jar in a bright, indirect light spot. Think near an east-facing window or under a grow light. I learned the hard way that direct sunlight can cook the cutting, so avoid it.
Step 4: Wait for roots
Roots typically appear in 4–6 weeks, starting as small white nubs and growing into a network of 2–3 inches. I check mine weekly, and seeing those first roots always feels like a victory. Be patient—fiddle leaf figs can be slow.
If roots don’t form after 8 weeks, the cutting may not be viable, or the node might not be submerged properly.
Step 5: Transplant to soil
Once roots are 2–3 inches long, transfer the cutting to a small pot with well-draining soil (60% potting soil, 20% perlite, 20% bark). Plant the cutting about 2 inches deep, water lightly, and place it in bright, indirect light.
I cover mine with a plastic bag to trap humidity for the first 2 weeks, which helps it adjust. Water when the top inch of soil feels dry, and avoid overwatering. My first propagated fig got soggy roots because I was overzealous. I’ll never forget the mistake.
Method 2: Propagating Fiddle Leaf Fig in Soil
Soil propagation skips the water step and roots directly in soil, which some prefer for a sturdier start. Here’s how:
Step 1: Select and cut the stem
Choose a 6–8-inch stem with 2–4 leaves. Cut below a node at a 45-degree angle, just like water propagation. Sterilize your shears to avoid infections. I once skipped this and lost a cutting to rot.
Step 2: Prepare the cutting
Remove the bottom leaves, leaving 1–2 at the top. Dip the cut end in rooting hormone (I use a powder like Clonex) to encourage faster rooting, though it’s optional. The hormone helped my cuttings root in 3–4 weeks instead of 6.
Step 3: Plant in soil
Fill a small pot with a well-draining mix (same as above). Make a hole with a pencil, insert the cutting so the node is 1–2 inches below the soil, and firm the soil around it. Water lightly to settle the soil.
You may place a plastic bag or a clear plastic bottle (cut in half) over the pot to create a mini greenhouse, which boosts humidity.
Step 4: Provide ideal conditions
Place the pot in bright, indirect light and keep the soil slightly moist but not soggy. Aim for 65–75°F and 40–60% humidity. I use a humidifier near my cuttings, especially in winter, to mimic their tropical origins.
Roots typically form in 4–8 weeks, though you won’t see them. Gently tug the cutting after 6 weeks; if it resists, roots are forming.
Step 5: Transition to regular care
Once the cutting feels anchored and new growth appears (usually 8–12 weeks), remove the plastic cover and treat it like a mature fiddle leaf fig. I was thrilled when my first soil-propagated fig sprouted a new leaf—it felt like a parenting win.
Method 3: Air Layering (Advanced Technique)
Air layering is a more advanced method for propagating without cutting the stem off the mother plant. It’s perfect for large, leggy figs you don’t want to chop. Here’s how it works:
Step 1: Choose a spot
Select a healthy stem section, ideally 12–18 inches from the top, with a node. I tried this on a tall, sparse fig, and it worked like magic.
Step 2: Make an incision
Using a sterilized knife, make a 1-inch upward slit through the node or strip a ring of bark around the stem. This exposes the inner tissue where roots will form.
Step 3: Apply rooting hormone and moss
Dust the wound with rooting hormone, then wrap it with damp sphagnum moss. Cover the moss with plastic wrap and secure it with twist ties to keep it moist. Check the moss weekly, adding water if it dries out.
Step 4: Wait for roots
Roots form in 6–12 weeks. I was amazed when I unwrapped the plastic and found a tangle of white roots. Once roots are 2–3 inches long, cut the stem below the root ball and plant it in a pot with well-draining soil.
Step 5: Care for the new plant
Treat the new plant like a soil-propagated cutting. Keep it in bright, indirect light and maintain slight soil moisture. Air-layered plants often establish faster because they’re already robust.
Common Mistakes to Avoid
Propagation isn’t foolproof, and I’ve made my share of mistakes. Here are pitfalls to watch for:
- Overwatering: Soggy soil or waterlogged cuttings lead to rot. I lost a cutting to this early on. Stick to light watering!
- Poor node placement: Cutting too far from a node or not submerging it in water/soil prevents rooting. Always cut just below the node.
- Low light: Insufficient light stalls rooting. My first cutting took ages because it was in a dim corner.
- Dirty tools: Unsterilized shears can introduce bacteria. I now wipe mine with alcohol before every cut.
- Impatience: Fiddle leaf figs root slowly. I used to check daily and stress out. Give it 4–8 weeks!
Aftercare for Propagated Fiddle Leaf Figs
Once your cutting has rooted and is potted, treat it like a baby fiddle leaf fig:
- Light: Provide 6–8 hours of bright, indirect light. I use a grow light in winter to keep mine happy.
- Watering: Water when the top inch of soil is dry, usually every 7–10 days. Overwatering is a killer. So, use a moisture meter if you’re unsure.
- Humidity: Aim for 40–60% humidity. A humidifier or pebble tray works wonders.
- Temperature: Keep it at 65–75°F, away from drafts or heaters.
- Fertilizer: Start fertilizing with a diluted (half-strength) balanced fertilizer (10-10-10) monthly in spring/summer, 4–6 weeks after potting.
My first propagated fig was droopy for a week after potting, but with consistent care, it bounced back and is now a foot tall.
FAQs About Fiddle Leaf Fig Propagation
Q: How long does it take for a fiddle leaf fig cutting to root?
A: Typically 4–8 weeks in water or soil, though air layering may take 6–12 weeks.
Q: Can I propagate a fiddle leaf fig in winter?
A: It’s possible but slower due to reduced growth. Spring or summer is ideal. I tried winter propagation once, and it took 10 weeks to root.
Q: Why isn’t my cutting rooting?
A: Check for proper node placement, adequate light, and fresh water or moist soil. I had a cutting fail because the node wasn’t submerged—lesson learned.
Q: Can I propagate from a single leaf?
A: No, a leaf alone won’t grow a new plant. You need a stem with a node. I tried this as a newbie and got nowhere.
Q: How do I know if my cutting is healthy?
A: Look for firm, green leaves and new growth. If leaves turn yellow or wilt, check for overwatering or insufficient light.
Suggested For You:
Fiddle Leaf Fig Root Rot: Saving Your Plant From The Silent Killer
Fiddle Leaf Fig Leaves Curling? 8 Easy Fixes to Save Your Plant
Brown Spots on Fiddle Fig Leaves: Identification and Fixes
7 Reasons: Why Is My Fiddle Leaf Fig Dropping Leaves?
7 Reasons: Why Are My Fiddle Leaf Fig Leaves Turning Yellow?
Fiddle Leaf Fig Cultivation: Your Ultimate Guide to Growing This Stunning Houseplant
Final thoughts
Propagating my fiddle leaf fig was a mix of nerves and excitement. My first attempt was a water propagation that rooted in 6 weeks. This made me feel like a proud plant parent when I potted it. Since then, I’ve tried soil propagation and air layering, each with its own challenges.
The key is patience and attention to detail. Sterilize your tools, choose the right stem, and don’t rush the process. Now, my home is filled with fiddle leaf figs, each a testament to trial, error, and a lot of love.
Tim M Dave is a gardening expert with a passion for houseplants, particularly cacti and succulents. With a degree in plant biology from the University of California, Berkeley, he has vast experience in gardening. Over the years, he has cultivated a vast collection of desert plants and learned a great deal about how to grow and care for these unique companions.