Beginner: Green Velvet Boxwood Planting Guide ( Site Selection, Problems, and Growing Details)
If there is one shrub that appears in more well-designed gardens than almost any other, it is the boxwood. And among the many boxwood cultivars available, Green Velvet boxwood stands out as a favourite for good reason. It is tough, tidy, and beautiful in every season.
Once you understand how to plant it correctly, it practically takes care of itself.
This guide covers everything you need to know about green velvet boxwood planting — from site selection and soil preparation to the step-by-step planting process, care schedule, and troubleshooting common problems.
Green Velvet Boxwood at a Glance
Green Velvet boxwood is a hybrid cultivar, a cross between Buxus sempervirens (common boxwood) and Buxus microphylla (littleleaf boxwood). That parentage gives it the best traits of both species — the rich, dark foliage of common boxwood combined with the cold hardiness and compact habit of littleleaf boxwood.
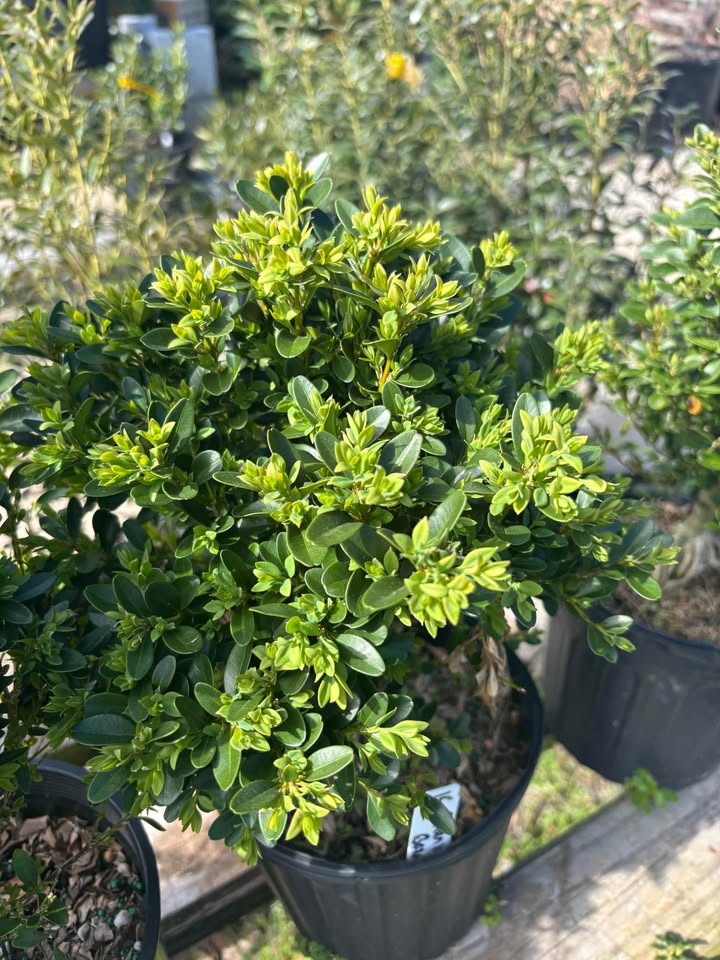
The result is a low, rounded, mounding shrub that typically grows 2 to 4 feet tall and slightly wider. Its leaves are small, glossy, and a deep emerald green that holds remarkably well through winter without the bronze discoloration that affects many other boxwoods.
It earned its name honestly. The dense, fine-textured foliage has a soft, almost velvety appearance — particularly after a fresh trim. Run your hand along a well-pruned Green Velvet hedge and you will understand immediately why gardeners keep coming back to it.
| Common Name | Green Velvet Boxwood |
| Scientific Name | Buxus ‘Green Velvet’ |
| Plant Type | Broadleaf evergreen shrub |
| Parentage | Hybrid (Buxus sempervirens × Buxus microphylla) |
| USDA Hardiness Zones | 4 – 9 |
| Mature Height | 2 – 4 feet (60 – 120 cm) |
| Mature Spread | 3 – 4 feet (90 – 120 cm) |
| Growth Rate | Slow to moderate |
| Natural Form | Rounded, mounding |
| Foliage | Small, glossy, dark emerald green |
| Winter Color | Retains green (minimal bronzing) |
| Sun Requirement | Full sun to partial shade |
| Soil Preference | Well-drained, slightly acidic to neutral (pH 6.5–7.0) |
| Water Needs | Moderate |
| Drought Tolerance | Moderate once established |
| Pruning Needs | Low — light shearing 1–2 times per year |
| Deer Resistance | Moderate to good |
| Toxicity | Toxic if ingested by humans or animals |
| Landscape Use | Hedges, borders, foundation planting, topiary, containers |
| Best Planting Season | Spring or early autumn |
Green Velvet Boxwood Planting Site
Getting the location right is the single most important step in green velvet boxwood planting. A poor site choice leads to years of struggling plants. A well-chosen site means a thriving, nearly maintenance-free shrub.
Sunlight Requirements
Green Velvet boxwood grows well in full sun to partial shade. In northern climates, full sun generally produces the tightest, most compact growth and the best foliage density.
In southern zones approaching zone 8 or 9, some afternoon shade is beneficial — it reduces heat stress and prevents the foliage from yellowing during the hottest months.
Avoid deep, full shade. While Green Velvet tolerates shade better than many shrubs, dense shade leads to loose, open growth and reduced foliage density. It also increases the risk of fungal problems by limiting airflow and sunlight penetration.
A position that receives morning sun and light afternoon shade is often ideal for warm-climate gardeners.
Drainage Is Non-Negotiable
If there is one condition Green Velvet boxwood will not forgive, it is wet feet. Poorly drained, waterlogged soil causes root rot — the leading cause of boxwood decline in home landscapes.
Before planting, assess your drainage. After a heavy rain, check whether water pools or drains away within an hour. If water sits for several hours or more, you have a drainage problem that must be corrected before planting.
Raised beds, sloped planting areas, or amended soil with improved drainage structure are all valid solutions.
Wind Exposure
Green Velvet handles wind reasonably well, but harsh, desiccating winter winds can damage foliage and cause winter burn.
If your intended planting site is exposed to strong prevailing winds — particularly in zones 4 and 5 — consider a location with some natural wind protection, such as near a building wall, fence, or established windbreak planting.
Soil Preparation for Green Velvet Boxwood Planting
Boxwoods are particular about their soil. Spending time on soil preparation before planting pays dividends for years afterward.
Ideal Soil pH
Green Velvet boxwood prefers a soil pH of 6.5 to 7.0 — slightly acidic to neutral. Outside this range, nutrient uptake is affected even if fertilizer is applied. Soil that is too acidic (below 6.0) or too alkaline (above 7.5) can cause nutrient deficiencies and poor growth.
Always test your soil before planting. Home soil test kits are inexpensive and widely available. University extension services in most states offer soil testing at low cost, with detailed nutrient and pH reports. If the pH is too low, incorporate ground limestone. If it is too high, apply elemental sulfur or acidifying fertilizer.
Soil Structure and Amendment
In addition to pH, soil texture matters. Boxwoods perform best in loamy, well-draining soil with good organic matter content.
If your soil is heavy clay, work in generous amounts of compost — 3 to 4 inches mixed into the top 12 inches of soil — to improve drainage and aeration.
If your soil is sandy and drains too quickly, compost again is your friend. It improves moisture retention in sandy soils just as it improves drainage in clay soils.
Avoid using peat moss as a primary amendment. While it acidifies soil, it can become hydrophobic when dry and is not a sustainable choice for large-scale planting.
Step-by-Step Green Velvet Boxwood Planting Guide
When to Plant
The two best planting windows for Green Velvet boxwood are:
- Early spring — Plant after the last frost date when soil has warmed. Spring planting gives the shrub a full growing season to establish roots before winter.
- Early to mid-autumn — Autumn planting is often preferred by experienced gardeners. The soil is warm, air temperatures are cool, and reduced evaporation means less watering stress. Roots continue to grow through autumn even after top growth slows.
Avoid planting in the heat of summer unless you can commit to very frequent watering. Summer heat stresses newly planted shrubs before they have established root systems.
Spacing for Hedges and Borders
Spacing depends on your intended use:
- Formal hedge: Space plants 2 to 2.5 feet apart (centre to centre) for a dense, continuous hedge. They will knit together within 2 to 3 years.
- Informal border or mass planting: Space 2.5 to 3 feet apart for a looser mass that still fills in fully.
- Foundation planting: Allow 3 feet from the building wall to ensure adequate airflow and prevent moisture buildup against the structure.
- Single specimen: Allow the full mature spread of 3 to 4 feet with no competition.
Planting Steps
Follow these steps carefully for the best results:
Step 1 — Prepare the planting hole. Dig a hole two to three times wider than the root ball and exactly as deep. The width matters more than the depth. Wide holes allow roots to expand laterally into loosened soil. A hole that is too deep causes the plant to sink, burying the crown and inviting rot.
Step 2 — Check the depth. Place the root ball in the hole and confirm that the top of the root ball sits level with or just slightly above the surrounding soil grade. Planting too deep is one of the most common mistakes gardeners make with boxwoods.
Step 3 — Remove the container or wrapping. If container-grown, slide the plant out carefully. If the roots are circling the inside of the pot, gently loosen and straighten them before planting. Circling roots left uncorrected can eventually girdle the plant.
Step 4 — Backfill with original soil. Use the soil you removed from the hole to backfill. There is no need to add fertilizer or amendments directly into the backfill.
Amendments in the planting hole can actually discourage roots from growing outward into the surrounding native soil. Firm the soil gently in layers to eliminate air pockets.
Step 5 — Water thoroughly. After planting, water slowly and deeply until the entire root zone is saturated. This settles the soil and eliminates air pockets around the roots.
Step 6 — Apply mulch. Spread a 2 to 3 inch layer of organic mulch — shredded bark, wood chips, or composted leaves — over the root zone, extending to the drip line of the plant.
Leave a 2 to 3 inch gap around the base of the stems. Mulch against the stems traps moisture and creates conditions favourable to crown rot and pest damage.
Watering After Planting
Proper watering in the first growing season is critical. Newly planted Green Velvet boxwoods have not yet established the root network needed to sustain themselves through dry periods.
During the first growing season, water deeply once or twice per week in the absence of rain. The goal is to keep the root zone consistently moist — not waterlogged, not dry.
A simple test: push a finger 2 to 3 inches into the soil near the root zone. If it feels dry, water. If it feels moist, wait another day or two.
From the second season onward, established Green Velvet boxwoods need supplemental watering only during extended dry periods of two weeks or more.
Water deeply and infrequently rather than shallowly and often. Deep watering encourages roots to grow downward, improving drought resilience.
Fertilizing Green Velvet Boxwood
Boxwoods are not heavy feeders, and over-fertilizing is a more common problem than under-fertilizing in home landscapes. Excess nitrogen promotes soft, lush growth that is more vulnerable to winter damage and pest pressure.
Apply a balanced slow-release granular fertilizer (such as 10-10-10 or a formula specifically designed for broadleaf evergreens) in early spring, just as new growth begins. One application per year is usually sufficient for established plants.
Avoid fertilizing after midsummer. Late-season fertilization stimulates new growth that does not have time to harden before frost, increasing winter damage risk.
For newly planted boxwoods, wait at least 6 to 8 weeks after planting before applying any fertilizer. The roots need time to settle before being pushed with nutrients.
Pruning Green Velvet Boxwood
One of the genuine pleasures of growing Green Velvet is how little pruning it demands. Its naturally rounded form does most of the work for you.
When to Prune
The best time for shaping is late spring, after the new growth flush has emerged and hardened off — typically late May to early June in most of North America.
A second light trim in midsummer keeps the hedge or border looking sharp through the rest of the growing season.
Never prune in late summer or autumn. Late pruning stimulates new growth that is vulnerable to frost damage.
How to Prune
For informal specimens, a light trim with hand shears is usually all that is needed. For formal hedges, use electric or cordless hedge shears for efficiency. Cut back new growth by about one-third, maintaining the rounded or flat-top shape you prefer.
Keep shears sharp and clean. Dull blades tear rather than cut cleanly, leaving ragged edges that are slower to heal and more susceptible to disease.
Sanitize pruning tools with a solution of one part bleach to nine parts water — particularly if you are pruning multiple plants. This simple step prevents the spread of boxwood blight between plants.
Common Problems and Solutions
Boxwood Blight
Boxwood blight (Calonectria pseudonaviculata) is a serious fungal disease causing rapid defoliation and stem cankers. It spreads through infected plant material, tools, and splashing water.
Prevention is the best strategy. Space plants to allow good airflow, avoid overhead watering, sanitize tools between plants, and inspect new plants before introducing them to the garden. If blight is detected, remove and destroy affected material promptly — do not compost it.
Boxwood Leafminer
The boxwood leafminer (Monarthropalpus flavus) is the most damaging insect pest. Larvae tunnel inside leaves, causing blistered, discolored foliage. Adult flies emerge in spring, laying eggs in new leaves.
Systemic insecticides applied in early spring provide good control. Alternatively, neem oil or spinosad offer lower-toxicity options for home gardeners.
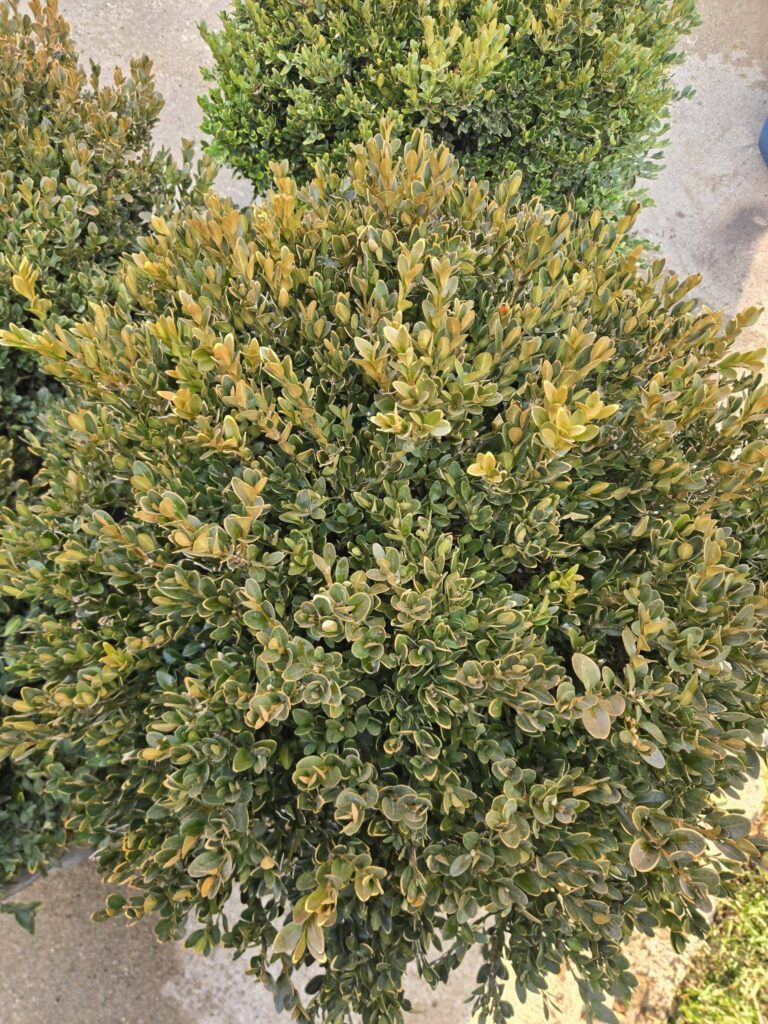
Winter Bronzing
Some Green Velvet plants develop slight bronze or yellowish tones in severe winters, particularly in zones 4 and 5. This is a physiological response to cold and desiccation, not a disease.
The foliage typically returns to green in spring. Ensuring good soil moisture going into winter and providing wind protection reduces bronzing significantly.
Root Rot
Yellowing foliage, wilting despite adequate watering, and poor overall vigor often indicate root rot caused by Phytophthora species. The only reliable solution is to improve drainage and avoid overwatering. Severely affected plants usually cannot be saved and should be removed.
Landscape Design Ideas for Green Velvet Boxwood
Green Velvet boxwood is one of the most versatile shrubs in the landscape designer’s toolkit. Here are some proven ways to use it effectively:
Formal hedges. A clipped row of Green Velvet creates a crisp, formal edge for pathways, driveways, and garden compartments. Its fine texture and consistent height make it ideal for this purpose.
Foundation planting. The shrub’s rounded, low-growing form softens the base of buildings without obstructing windows. It maintains a tidy appearance year-round with minimal attention.
Mixed borders. Use Green Velvet as a structural anchor in mixed perennial and shrub borders. Its consistent evergreen form provides a stable framework that makes neighbouring plants look more composed.
Topiary. Though Green Velvet grows slowly, its dense branching structure makes it excellent for shaping into spheres, cones, or geometric forms over time.
Container planting. In a large, quality container, Green Velvet makes a handsome patio or entryway plant. Ensure the container has drainage holes and use a well-draining potting mix.
Knot gardens and parterres. For gardeners drawn to formal, historical garden styles, Green Velvet is a contemporary cultivar well-suited to traditional geometric designs.
Companion Plants for Green Velvet Boxwood
Pairing Green Velvet boxwood with the right neighbours enhances its visual impact:
- Ornamental grasses such as Karl Foerster feather reed grass provide vertical contrast to the low, rounded boxwood form.
- Perennials like lavender, salvia, and catmint soften the formality of boxwood hedges with colour and texture.
- Spring bulbs — tulips, alliums, and narcissus — naturalized in front of a boxwood hedge create a stunning seasonal display.
- Roses, particularly shrub roses or landscape roses, pair beautifully with boxwood in traditional garden designs. The rose’s loose, flowering form contrasts perfectly with the boxwood’s neat structure.
- Conifers such as dwarf Alberta spruce or compact junipers provide vertical interest and year-round evergreen contrast.
Why Choose Green Velvet Boxwood?
Before getting into planting, it is worth understanding why this particular cultivar deserves a place in your garden over the dozens of other boxwood options.
Cold hardiness is a major advantage. Thanks to its microphylla parentage, Green Velvet is reliably hardy to zone 4, tolerating temperatures down to -30°F (-34°C).
Many gardeners in cold-climate states like Minnesota, Wisconsin, and Michigan have discovered it outperforms common boxwood through brutal winters.
It holds its color. Unlike some cultivars that turn yellowish or bronzed in winter, Green Velvet maintains its rich emerald tone throughout the cold months — a real asset in a winter garden.
It is naturally rounded. Its mounding habit means it rarely needs heavy shaping. A light trim once or twice a year keeps it looking crisp without significant effort.
It is adaptable. Green Velvet performs well in a wide range of soils and light conditions, making it forgiving for gardeners across different climates and soil types.
Final Thoughts
Green Velvet boxwood rewards the gardener who takes the time to plant it correctly. The most important steps — choosing a well-drained site, testing and adjusting soil pH, planting at the right depth, and watering consistently through the first season — are not complicated. They simply require attention and a little patience.
Done right, a Green Velvet boxwood will still be performing beautifully in your garden twenty years from now. That kind of long-term return on a garden investment is rare. And there is genuine satisfaction in watching a well-planted hedge settle in, fill out, and become an enduring part of the landscape you have built.
Plant it carefully. Care for it consistently. Then step back and let it do what it does best.
References
- NC State Extension – Buxus ‘Green Velvet’ Plant Profile https://plants.ces.ncsu.edu/plants/buxus-green-velvet/
- Clemson Cooperative Extension – Boxwoods https://hgic.clemson.edu/factsheet/boxwoods/
- Penn State Extension – Boxwood Blight https://extension.psu.edu/boxwood-blight
- University of Maryland Extension – Boxwood Care and Maintenance https://extension.umd.edu/resource/boxwood-care-and-maintenance
- University of Illinois Extension – Choosing Shrubs for the Landscape https://extension.illinois.edu/global/choosing-shrubs-landscape
Tim M Dave is a gardening expert with a passion for houseplants, particularly cacti and succulents. With a degree in plant biology from the University of California, Berkeley, he has vast experience in gardening. Over the years, he has cultivated a vast collection of desert plants and learned a great deal about how to grow and care for these unique companions.