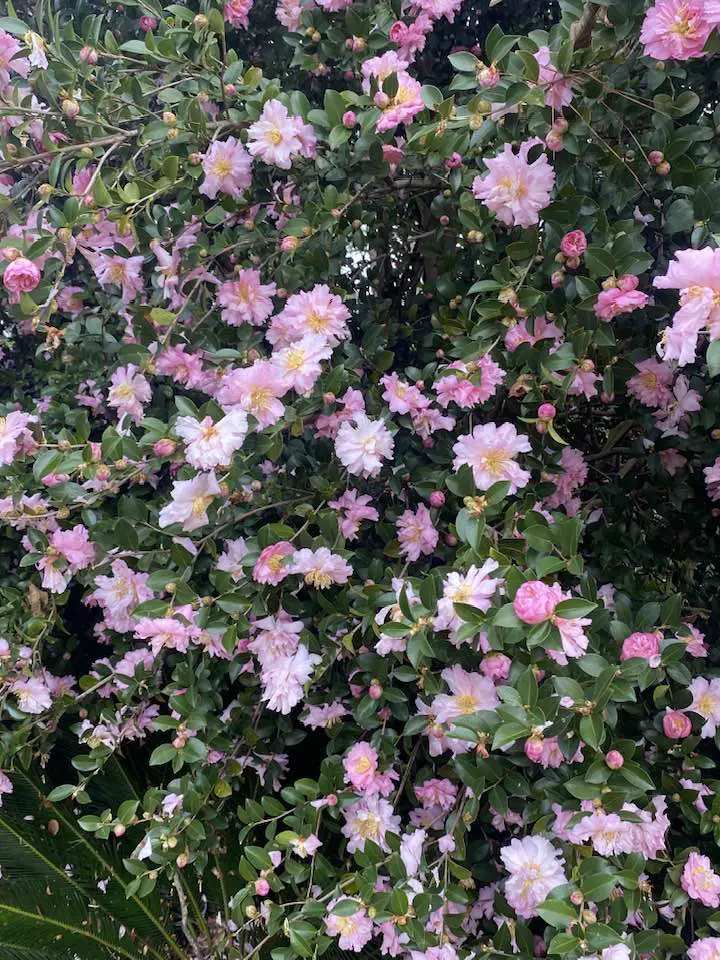
Understanding Camellia Sasanqua: History and Care Details
When I first planted a Camellia sasanqua in my backyard, I had no idea how much joy its delicate blooms and glossy foliage would bring. This evergreen shrub, with its vibrant flowers, is a standout in any garden, especially when most plants are winding down for the season.
If you’re looking to add a touch of fall elegance to your landscape, Camellia sasanqua is a must-have. In this comprehensive guide, I’ll dive into its history, classification, characteristics, care tips, and common problems, while sharing practical insights to help you grow this beauty successfully.
Let’s explore why Camellia sasanqua deserves a spot in your garden!
Brief History of Camellia Sasanqua
Camellia sasanqua has a rich history tied to its native roots in southern Japan, specifically in regions like Kyushu, the Ryukyu Islands, and Shikoku. Growing naturally in lowland forests, this plant has been cherished for centuries.
In Japan, it’s known as sazanka, meaning “plum-flowered tea.” Its aromatic leaves and flowers were traditionally dried and added to teas for their fragrance. The plant’s cultivation began in earnest during Japan’s Edo period (1603–1868), with records of cultivars appearing as early as the late 17th century.
By 1820, Camellia sasanqua made its way to the West when Captain Richard Rawes brought a variety to England aboard the East Indiaman Warren Hastings.Since then, it has become a beloved ornamental shrub in gardens worldwide, particularly in the American South, where it’s been cultivated for nearly 200 years.
Today, Camellia sasanqua is celebrated for its fall-to-winter blooms, offering color and charm when most gardens are dormant. Its versatility and elegance have made it a favorite among gardeners and landscapers alike.

Classification of Camellia Sasanqua
Camellia sasanqua belongs to the Theaceae family, which includes over 220 species of camellias. The genus Camellia is named after George Joseph Kamel, a Moravian Jesuit missionary who introduced Asian flora to Europe, though he never encountered camellias himself.
Within the Camellia genus, C. sasanqua is distinct from its cousin, Camellia japonica, due to its smaller leaves, earlier blooming season, and more open growth habit. It’s also closely related to C. hiemalis and C. vernalis, often used in hybrids.
With over 300 named cultivars, C. sasanqua offers a wide range of forms and colors, making it a versatile choice for gardeners.
Characteristics of Camellia Sasanqua
Here’s a closer look at the features that make Camellia sasanqua so special:
- Scientific Name: Camellia sasanqua Thunb.
- Common Names: Sasanqua camellia, sazanka (Japanese), Yuletide camellia (for specific cultivars like ‘Yuletide’).
- USDA Hardiness Zones: 7–9, though some hybrids tolerate Zone 6 with protection.
- Color Variation: Flowers range from white to deep pink, with shades of red, rose, and bicolor options. Popular cultivars like ‘Yuletide’ (red with yellow stamens) and ‘Fragrant Pink’ (soft pink) add vibrancy.
- Sun Exposure: Prefers partial shade to full sun, more sun-tolerant than C. japonica. Avoid harsh afternoon sun to prevent leaf scorch.
- Mature Size: Grows 6–14 feet tall and 5–10 feet wide, depending on the cultivar and conditions. Dwarf varieties like ‘Shishi Gashira’ stay under 5 feet.
- Growth Rate: Moderate to fast, adding 12–24 inches per year under optimal conditions. It’s faster-growing than C. japonica.
- Lifespan: Long-lived, often thriving for 50–100 years or more with proper care.
- Toxicity: Non-toxic to humans and pets, making it safe for family gardens. However, deer may find it tasty, so fencing may be needed in deer-prone areas.
The plant’s glossy, dark green leaves are smaller (1.2–2.8 inches) and less coarse than those of C. japonica, giving it a refined, airy appearance. Its flowers, typically 2–3 inches in diameter, are single or semi-double, with a subtle, sweet fragrance that attracts pollinators.
Unlike C. japonica’s dense habit, C. sasanqua’s open structure blends seamlessly with other shrubs, making it ideal for mixed borders or woodland gardens.
Care and Growing Details for Camellia Sasanqua
Growing Sasanqua camellia is surprisingly easy if you follow a few key guidelines. Here’s how I keep mine thriving:
1. Planting for success
Here are the important aspects of growing this fall-blooming beauty.
Site Selection
Choosing the right spot is crucial for Camellia sasanqua. I learned this the hard way when I planted my first one in a sunny corner of my yard, only to see its leaves scorch under the afternoon sun. This plant loves partial shade—think morning sun with afternoon shade or dappled light under tall trees.
In hotter climates (USDA Zones 8–9), avoid spots with intense afternoon sun to prevent leaf burn. In cooler areas (Zone 7 or sheltered Zone 6), you can get away with more sun, but always ensure the roots stay shaded with mulch or low-growing plants.
If you’re in a windy area, plant near a fence, wall, or other shrubs to shield your camellia from drying winter winds, which can stress the plant and cause leaf drop. I’ve found that planting on the north or east side of my house works wonders, offering protection while still providing enough light for blooms.
Soil Preparation
Camellia sasanqua craves slightly acidic, well-drained soil with a pH of 6.0–6.5. Before planting, I always test my soil with a pH kit. If the pH is too high (alkaline), the plant may develop chlorosis, with yellowing leaves and poor growth.
To lower pH, mix in sphagnum peat moss, garden sulfur, or compost—about 3–6 inches worked into the top 12 inches of soil. For sandy soils, add organic matter like composted pine bark or leaf mold to improve water retention. Heavy clay soils need extra drainage, so incorporate perlite or coarse sand to prevent root rot.
Planting Timing
Timing is everything. I prefer planting in fall or early winter (November–February in most regions) because cooler temperatures allow roots to establish without the stress of summer heat. This timing also aligns with the plant’s natural growth cycle, as it prepares for its fall-to-winter bloom.
If you must plant in spring or summer, be diligent about watering—daily for the first few weeks—to help the plant settle in. Avoid planting during extreme heat or freezing conditions, as both can shock the roots.
Planting Technique
Here’s how I plant my Camellia sasanqua to ensure a strong start:
- Dig a hole two to three times wider than the root ball but only as deep as the root ball itself. A wide hole encourages roots to spread outward.
- Place the root ball so the top sits 1–2 inches above the soil line. Camellias dislike being planted too deep, as it can suffocate roots.
- Backfill with a mix of native soil and organic matter (50:50 ratio). Gently firm the soil but don’t compact it too tightly.
- Water thoroughly after planting to settle the soil, then add a 2–3-inch layer of mulch (pine bark, wood chips, or shredded leaves) around the base, keeping it 2 inches away from the stem to prevent rot.
- Space plants 5–10 feet apart, depending on the cultivar, to allow for mature growth and good air circulation.
Container Planting
If you’re short on space or want flexibility, C. sasanqua grows beautifully in containers. I have a dwarf ‘Shishi Gashira’ in a large ceramic pot on my patio, and it’s a showstopper. Use a well-draining, acidic potting mix (look for mixes labeled for azaleas or camellias).
Choose a container at least 18–24 inches wide with drainage holes to prevent waterlogging. Place it in a spot with morning sun and afternoon shade, and elevate the pot slightly to ensure good drainage. Containers dry out faster, so check soil moisture daily, especially in hot weather.

2. Watering Wisely
Newly planted Camellia sasanqua needs consistent moisture to develop a strong root system. For the first 6–12 months, I water mine every 1–2 days, ensuring the soil stays moist but not soggy. A good rule of thumb is to provide about 1 inch of water per week, either through rainfall or manual watering.
I use a soaker hose or drip irrigation to deliver water directly to the root zone, avoiding wet foliage that can invite fungal issues.
Mature Plants
Once established, C. sasanqua is surprisingly drought-tolerant, but it performs best with regular watering. I water mine weekly during dry spells, especially from late summer to early fall when flower buds form.
Bud drop—a common frustration—often results from inconsistent watering, so keep the soil evenly moist during this period. In my experience, a deep watering (about 10–15 minutes with a hose on low) every 7–10 days is sufficient in most climates. Always check the top 2 inches of soil; if it’s dry, it’s time to water.
Mulching for Moisture
Mulch is a game-changer for maintaining soil moisture and regulating temperature. I apply a 2–3-inch layer of organic mulch like pine straw or shredded bark around my camellias every spring. This not only conserves water but also keeps roots cool in summer and insulated in winter.
Just make sure the mulch doesn’t touch the plant’s stem, as this can trap moisture and cause rot. Refresh the mulch annually to maintain its benefits.
Avoiding Overwatering
Overwatering is a common mistake, especially in poorly drained soils. If you notice yellowing leaves or soggy soil, cut back on watering and check for drainage issues. I once lost a young camellia to root rot because I didn’t realize my soil was holding too much water.
If drainage is a concern, consider planting on a slight mound or adding sand to the soil mix.
3. Fertilizing for Vibrant Growth
Fertilizing at the right time keeps your Camellia sasanqua healthy without encouraging weak growth. I fertilize mine once or twice a year: once in early spring (March or April) to support new growth and again in early summer (June) to boost flower production.
Avoid fertilizing after August, as late feeding can produce tender growth that’s susceptible to winter damage.
Choosing the Right Fertilizer
Use a slow-release, nitrogen-rich fertilizer formulated for acid-loving plants, such as 12-4-8 or 15-5-15. These ratios provide the nitrogen needed for lush foliage and the phosphorus and potassium for strong roots and blooms.
I’ve had great success with products like Holly-tone or Miracle-Gro for Azaleas and Camellias. Apply about 0.5 pounds per 100 square feet of garden area, following package instructions to avoid over-fertilizing, which can burn roots or cause excessive leaf growth at the expense of flowers.
Addressing Nutrient Deficiencies
If your camellia’s leaves turn yellow with green veins (a sign of chlorosis), it may lack iron or magnesium. I had this issue with one of my plants when my soil pH crept above 7.0. A soil test confirmed the problem, and I applied chelated iron (available at garden centers) at the recommended rate.
Alternatively, you can mix 1 tablespoon of Epsom salt per gallon of water and apply it as a foliar spray or soil drench to address magnesium deficiency. Always test your soil pH first to pinpoint the cause.
Organic Options
For organic gardeners, composted manure or cottonseed meal works well as a natural fertilizer. I sometimes top-dress my camellias with a thin layer of compost in spring, which slowly releases nutrients and improves soil structure. Just be cautious with fresh manure, as it can burn roots if not fully composted.
4. Pruning for Shape and Health
Pruning at the right time is key to preserving next year’s blooms. I prune my Camellia sasanqua in late winter or early spring, right after flowering ends (usually February or March). This timing avoids removing the flower buds that form in summer for the next season’s display.
If you’re shaping or training the plant (e.g., as an espalier or hedge), light pruning throughout the growing season is fine, but heavy pruning should wait until after blooming.
Pruning Techniques
Here’s how I approach pruning to keep my camellias healthy and attractive:
- Remove dead or diseased Wood: Cut away any dead, damaged, or diseased branches to prevent the spread of pathogens. Look for branches with discolored or shriveled leaves.
- Thin for air circulation: C. sasanqua has an open growth habit, but dense areas can develop, especially in older plants. Thin out crowded branches to improve airflow and reduce the risk of fungal diseases like petal blight. I use sharp, clean bypass pruners to make precise cuts.
- Shape sparingly: For shaping, cut just above the previous year’s growth scar (a ring-like mark on the stem) to maintain the plant’s natural form. I’ve trained my ‘Yuletide’ into a loose hedge by trimming back about 6–12 inches annually.
- Deadhead spent blooms: After flowering, I pinch off faded flowers to tidy the plant and reduce nutrient drain. This also minimizes the risk of petal blight, as decaying petals can harbor fungi.
Espalier and Topiary
C. sasanqua is a fantastic candidate for espalier or topiary due to its flexible branches and moderate growth rate. I’ve trained one against a fence using soft ties and a wire frame, creating a stunning vertical display.
If you’re trying this, prune regularly to maintain the shape, and be patient—it can take a few years to achieve the desired effect.
Avoid Over-Pruning
Less is more with C. sasanqua. Over-pruning can stress the plant and reduce flowering. I made this mistake early on, shearing a plant too aggressively and ending up with sparse blooms the next year. Stick to light, targeted cuts to maintain its natural beauty.
5. Managing Sun and Shade
Unlike its fussier cousin Camellia japonica, C. sasanqua is more sun-tolerant, but it still needs the right balance. In my garden, I’ve found that 4–6 hours of morning sun with afternoon shade produces the best growth and blooms.
Too much sun, especially in hot climates, can cause sunscald, where leaves turn bronze or brown and flowers fade quickly. If you notice this, relocate the plant (if potted) or add shade cloth during peak summer heat.
In cooler climates (Zone 7 or sheltered Zone 6), C. sasanqua can handle full sun if the soil stays moist and roots are shaded. I mulch heavily around the base to keep roots cool and prevent moisture loss.
If you’re in a hot region like Zone 9, plant under tall trees or near structures that provide afternoon shade. Companion plants like ferns or hostas can also create a microclimate that keeps the area cooler.
6. Winter Protection
In USDA Zones 7–9, Camellia sasanqua is generally hardy, but extra care in winter ensures it thrives. Here’s what I do to protect mine:
- Shelter from wind: Cold, drying winds can damage foliage and buds. I plant my camellias in spots shielded by fences, buildings, or evergreen shrubs. If you can’t avoid windy areas, wrap the plant in burlap or install a temporary windbreak during winter.
- Insulate roots: Add an extra 2–3 inches of mulch in late fall to insulate roots against freezing temperatures. I use pine straw because it’s lightweight and acidifies the soil slightly.
- Protect potted plants: For container-grown camellias, move them to a garage, greenhouse, or near a south-facing wall during cold snaps. I wrap my pots in bubble wrap or burlap to insulate roots, as pots are more vulnerable to freezing than in-ground plants.
- Cold-hardy cultivars: In Zone 6 or colder areas, choose cold-tolerant varieties like ‘Polar Ice’, ‘Winter’s Charm’, or ‘Snow Flurry’. These hybrids can withstand temperatures down to 0°F with proper care.
I once lost a young camellia to a sudden freeze because I didn’t mulch adequately. Now, I check the weather forecast and cover my plants with frost cloth if temperatures drop below 20°F. This simple step has saved my camellias from winter damage.
7. Companion Planting and Landscaping
C. sasanqua shines in mixed borders, woodland gardens, or as a standalone specimen. I love pairing mine with shade-loving plants like azaleas, hostas, ferns, or Japanese maples for a layered, textured look. Low-growing ground covers like pachysandra or liriope complement its airy structure and help retain soil moisture.
For a formal look, plant C. sasanqua as a hedge or espalier along a fence. Dwarf cultivars like ‘Shishi Gashira’ or ‘Mine-no-yuki’ are perfect for low hedges or container displays. I’ve also used taller varieties like ‘Setsugekka’ as privacy screens, as their upright growth creates a natural barrier.
When planning your garden, consider bloom times. Since C. sasanqua flowers in fall and winter, pair it with spring-blooming plants like daffodils or tulips to ensure year-round color. Its evergreen foliage provides a lush backdrop for seasonal perennials.
8. Monitoring and Maintenance
Regular check-ins keep your Camellia sasanqua healthy. I walk my garden weekly to inspect for pests, diseases, or signs of stress. Here are some maintenance tips:
- Check for pests: Scale insects are the biggest threat. Look for white, cottony patches or sticky honeydew on leaves. I use a magnifying glass to spot them early and treat with horticultural oil.
- Inspect leaves: Yellowing or drooping leaves can signal overwatering, nutrient deficiency, or poor drainage. Address the root cause promptly to prevent long-term damage.
- Clean up debris: Fallen petals and leaves can harbor fungi, so I rake them up regularly, especially during bloom season.
- Test soil annually: A yearly soil test helps me monitor pH and nutrient levels, ensuring my camellias get what they need.

Propagation of Camellia Sasanqua
Propagating Camellia sasanqua is a rewarding way to expand your garden or share this beautiful plant with others. Whether you’re a seasoned gardener or a beginner, you can successfully propagate this evergreen shrub using a few reliable methods.
Below, I’ll discuss the most effective propagation techniques—cuttings, air layering, and seeds—with practical tips and insights from my own experience. I’ll also cover the pros, cons, and steps for each method to help you choose the best approach for your needs.
1. Propagation by Cuttings
Taking stem cuttings is the most popular and reliable way to propagate Camellia sasanqua. It produces plants that are genetically identical to the parent, ensuring you get the same flower color, growth habit, and characteristics.
I’ve had great success with this method, especially with cultivars like ‘Yuletide’ and ‘Shishi Gashira’.
When to Take Cuttings
The best time is late summer to early fall (August–September), when the plant produces semi-hardwood growth—stems that are firm but still flexible. This timing aligns with the plant’s active growth phase, increasing rooting success.
Step-by-Step Process
Here’s how I propagate C. sasanqua from cuttings:
- Choose a healthy, non-flowering stem from the current season’s growth, about 4–6 inches long with 3–5 leaves. Avoid woody or overly soft stems.
- Using clean, sharp pruners, cut just below a leaf node at a 45-degree angle. Remove the lower leaves, leaving 2–3 at the top.
- Dip the cut end in rooting hormone powder or gel (available at garden centers) to encourage root growth. I use a product like Clonex, but any rooting hormone with IBA (indole-3-butyric acid) works.
- Fill a small pot with a mix of 50% perlite and 50% peat moss or a well-draining seed-starting mix. Make a hole with a pencil, insert the cutting about 2 inches deep, and firm the soil around it.
- Cover the pot with a clear plastic bag or place it in a propagation tray with a dome to maintain high humidity. Ensure the plastic doesn’t touch the leaves to prevent rot.
- Place the pot in a bright spot with indirect sunlight or under grow lights. Avoid direct sun, which can overheat the cuttings.
- Keep the soil consistently moist but not waterlogged. Mist the cuttings lightly if humidity drops. Roots typically form in 6–12 weeks.
- Check for roots by gently tugging the cutting; resistance indicates rooting. Once roots are 1–2 inches long, transplant to a larger pot with acidic potting mix or directly into the garden in spring.
Pros: Fast, reliable, and preserves the parent plant’s traits.
Cons: Requires patience and a controlled environment for rooting.
My Tip: Sterilize your tools with rubbing alcohol to prevent disease.
2. Propagation by Air Layering
Air layering is a fantastic method for propagating larger Camellia sasanqua plants without cutting them back. It’s ideal for older shrubs or rare cultivars where you want a mature plant quickly. I tried this with a ‘Setsugekka’ camellia that I didn’t want to prune heavily, and it worked like a charm.
When to Air Layer
The best time is spring to early summer (April–June), when the plant is actively growing, and the bark is easier to work with.
Step-by-Step Process
Here’s how I do air layering:
- Select a healthy, pencil-thick branch from the previous season’s growth, about 12–18 inches from the tip.
- Using a sharp knife, make two parallel cuts about 1 inch apart around the branch, then remove the bark between them to expose the inner wood. This encourages root formation.
- Dust the wounded area with rooting hormone powder to stimulate root growth.
- Soak sphagnum moss in water, squeeze out excess, and wrap it around the wounded area to form a 2–3-inch-thick ball.
- Wrap the moss tightly with clear plastic wrap, sealing both ends with twist ties or tape to retain moisture. Cover with aluminum foil to block light and prevent algae growth.
- Check the moss every 2–3 weeks to ensure it stays moist. Roots typically form in 2–4 months, visible through the plastic.
- Once roots are well-developed, cut the branch below the root ball and plant it in a pot or directly in the garden with well-drained soil. Water regularly to help it establish.
Pros: Produces a larger, established plant faster than cuttings. No need to cut the parent plant until roots form.
Cons: More labor-intensive and requires careful monitoring.
My Tip: I use a spray bottle to keep the moss moist if it starts drying out. Patience is key—don’t rush to detach the branch before roots are robust.
3. Propagation by Seeds
Growing Camellia sasanqua from seeds is less common because it’s slower and doesn’t guarantee plants identical to the parent due to genetic variation. However, it’s a fun way to experiment with new hybrids, especially if you’re a patient gardener.
I’ve tried this method for fun, and while it takes longer, it’s exciting to see what unique traits emerge.
When to Collect Seeds
Harvest seeds in late summer to early fall (August–October) when the seed pods turn brown and begin to split open. Each pod contains 1–3 shiny black seeds.
Step-by-Step Process
Here’s how I propagate from seeds:
- Pick ripe pods and let them dry for a day or two until they split. Remove the seeds and soak them in warm water for 24 hours to soften the hard outer coat.
- Fill a seed tray or small pots with a mix of 50% peat moss and 50% sand or a commercial seed-starting mix.
- Sow seeds ½ inch deep, spacing them 2 inches apart. Cover lightly with soil and water gently.
- Place the tray in a warm spot (70–75°F) with indirect light. Cover with a clear lid or plastic wrap to maintain humidity.
- Seeds can take 1–3 months to germinate. Keep the soil moist but not soggy.
- Once seedlings emerge, remove the cover and provide bright, indirect light. Transplant to individual pots when they have 2–3 true leaves (about 3–6 months).
- Seedlings may take 3–5 years to bloom, so be prepared for a long wait. Harden them off gradually before planting in the garden.
Pros: Fun for experimenting with new hybrids; low-cost if you have access to seeds.
Cons: Slow, unpredictable results; plants may not resemble the parent.
My Tip: I label my seed trays with the parent plant’s name and date to track progress. If you’re hybridizing, cross-pollinate flowers by hand to control the outcome.
Choosing the Right Method
- Cuttings: Best for most gardeners, especially if you want quick results and identical plants. Ideal for propagating specific cultivars.
- Air Layering: Great for creating larger plants or preserving rare varieties without sacrificing the parent plant.
- Seeds: Best for adventurous gardeners who enjoy experimenting and don’t mind waiting years for blooms.
In my garden, I stick to cuttings for reliability, but I’ve dabbled in air layering for a special cultivar I didn’t want to lose. Seeds are a fun side project, but I don’t rely on them for consistent results.
Tips for Propagation Success
- Always clean pruners, knives, or pots with rubbing alcohol to prevent fungal or bacterial infections.
- High humidity is critical for cuttings and air layering. A propagation dome or plastic bag works wonders.
- Propagation takes time, especially with seeds. Don’t be discouraged if results aren’t immediate.
- I learned the hard way to label cuttings and seedlings to avoid mix-ups, especially when propagating multiple cultivars.
- Keep cuttings and seeds at 70–75°F for optimal rooting and germination. A heat mat can help in cooler climates.

Common Problems and Solutions
Even with proper care, Camellia sasanqua can face challenges. Here are the most common issues and how to tackle them:
1. Scale Insects
Scale insects are small bugs with a protective shield-like scale. They spend most of their life attached by their mouth to a single plant, sometimes occurring in such large numbers that it becomes a serious pest. They can easily go unnoticed, blending in with plant tissue as bumps or growths.
- Symptoms: Concave yellow spots on leaves, white cotton-like patches on leaf undersides, or pink nodules on branches.
- Cause: Poor ventilation encourages scale insects.
- Solution: Improve air circulation through pruning. Apply horticultural oil or insecticidal soap to affected areas. Monitor regularly to catch infestations early.
2. Petal Blight
Petal blight is a fungal disease that attacks only the flowers, causing them to quickly develop water-soaked spots and turn into a brown, mushy mess.
- Symptoms: Browning of petals from edges to center.
- Cause: Fungal infection, less common in C. sasanqua due to its fall blooming season, which avoids favorable conditions for the fungus.
- Solution: Remove and dispose of infected flowers promptly. Avoid overhead watering to keep foliage dry. Apply a fungicide if necessary.
3. Chlorosis
This is the yellowing or whitening of normally green plant tissue due to a lack of chlorophyll, the essential green pigment responsible for photosynthesis.
- Symptoms: Yellow leaves with green veins.
- Cause: Alkaline soil or nutrient deficiencies (iron or magnesium).
- Solution: Test soil pH and amend with sphagnum peat moss or garden sulfur to lower it. Apply chelated iron or Epsom salt as needed.
4. Twig Blight
Twig blight is a plant disease causing woody twigs to die back from the tips, resulting in a “dieback” symptom. It’s caused by various fungal or bacterial pathogens that infect the new growth.
- Symptoms: Necrotic branches and pale yellow leaves.
- Cause: Fungal infection, often due to poor drainage or overwatering.
- Solution: Ensure well-drained soil and avoid overwatering. Prune affected branches and apply a fungicide. Improve soil drainage if needed.
5. Sunscald
This is the damage to a plant’s bark, leaves, or fruit caused by intense sun.
- Symptoms: Scorched or bronzed leaves.
- Cause: Excessive sun exposure, especially in hot climates.
- Solution: Relocate to a shadier spot or provide afternoon shade. Increase watering during dry periods.
6. Deer Damage
Although not common, deer can damage your plant by eating some of its parts.
- Symptoms: Chewed leaves or flowers.
- Cause: Deer find C. sasanqua palatable.
- Solution: Install fencing or use deer repellents. Plant in areas less accessible to deer.
FAQs
Here are quick answers to the commonly asked questions about the Camellia sasanqua plant.
Q: When does Camellia sasanqua bloom?
A: It typically blooms from October to January in the northern hemisphere, depending on the cultivar and climate.
Q: Is Camellia sasanqua toxic to pets?
A: No, it’s non-toxic to cats, dogs, and humans, making it safe for family gardens.
Q: Can I grow Camellia sasanqua in full sun?
A: It tolerates more sun than C. japonica, but partial shade or morning sun with afternoon shade is best to prevent sunscald.
Q: How tall does Camellia sasanqua grow?
A: It reaches 6–14 feet tall and 5–10 feet wide, though dwarf cultivars like ‘Shishi Gashira’ stay under 5 feet.
Q: How often should I water my Camellia sasanqua?
A: Water every 1–2 days during the first growing season. Once established, water weekly during dry spells, keeping soil moist but not soggy.
Q: What’s the best fertilizer for Camellia sasanqua?
A: Use a nitrogen-rich, slow-release fertilizer like 12-4-8 in spring and early summer. Avoid fertilizing after August to prevent cold damage.
Q: How do I prevent petal blight?
A: Remove infected flowers promptly, avoid overhead watering, and apply a fungicide if needed. Fall-blooming C. sasanqua is less prone to petal blight than C. japonica.
Final thoughts
Camellia sasanqua is more than just a pretty face—it’s a resilient, versatile, and long-lived addition to any garden. Its autumn blooms, fragrant flowers, and glossy foliage make it a standout. Its relatively easy care requirements make it accessible to gardeners of all levels.
Whether you’re creating a woodland retreat, a privacy hedge, or a container display, this plant delivers year-round beauty. By understanding its history, characteristics, and care needs, you can enjoy its elegance for decades.
So, grab a C. sasanqua cultivar that catches your eye, plant it with care, and watch your garden transform into a fall masterpiece.
References
- University of Washington Botanic Gardens. August Plant Profile: Camellia sasanqua. https://botanicgardens.uw.edu
- Wikipedia. Camellia sasanqua. https://en.wikipedia.org
- North Carolina Extension Gardener Plant Toolbox. Camellia sasanqua. https://plants.ces.ncsu.edu
- University of Florida IFAS Extension. Camellias at a Glance. https://edis.ifas.ufl.edu
Tim M Dave is a gardening expert with a passion for houseplants, particularly cacti and succulents. With a degree in plant biology from the University of California, Berkeley, he has vast experience in gardening. Over the years, he has cultivated a vast collection of desert plants and learned a great deal about how to grow and care for these unique companions.